

Webflow, a popular website builder, has gained widespread acclaim, with one of its standout features being the Editor Mode. This functionality revolutionizes website management, allowing owners to visually edit content without navigating the complexities of coding. In this comprehensive guide, we will delve into the myriad benefits of Webflow Editor Mode and explore how it can empower you in shaping your online presence.
The Advantages of Webflow Editor Mode
Webflow Editor Mode stands out as a user-friendly interface, empowering website owners to seamlessly manage content without the need for coding knowledge. Its distinctive strength lies in its ability to handle intricate web designs, allowing users to effortlessly add and edit text, images, videos, and more without impacting the underlying code. This feature makes Webflow a versatile tool for customization, enabling website owners to experiment with different designs and layouts. Here are several advantages of using the Webflow Editor:
User-Friendly Interface
The Webflow editor is designed to be intuitive, catering to both novices and experienced users. Its accessibility makes website management a breeze, ensuring that users can navigate and utilize its features with ease.
Time-Saving Capabilities
Editing your website through Webflow is significantly faster than traditional methods. Real-time changes provide instant feedback, allowing you to fine-tune your website quickly and efficiently. This time-saving aspect enhances productivity and facilitates a more dynamic and responsive web development process.
SEO-Friendly Features
Webflow Editor comes equipped with SEO-friendly features, including customizable meta tags and URL structures. These features contribute to enhancing your website's search engine ranking, ensuring that your content is optimized for discovery and visibility on popular search engines.
Cost-Efficient Solution
The simplicity of Webflow means you can make changes to your website without the need to hire a web designer or developer. This results in significant cost savings for website owners, as they can manage and customize their content independently, reducing reliance on external professionals.
Versatility in Design
Webflow's Editor Mode provides a robust toolset that allows for experimentation with different designs and layouts. The versatility offered empowers website owners to express their creativity and adapt their websites to changing preferences and trends in the digital landscape.
Real-Time Feedback
The real-time editing capabilities of Webflow Editor Mode provide instant feedback as you make changes. This immediate responsiveness allows for quick adjustments and a more iterative and agile approach to website management.
Collaboration and Workflow Enhancement
Webflow's collaborative features enable multiple team members to work on the same project simultaneously. This enhances workflow efficiency and facilitates seamless collaboration among team members, ensuring that everyone can contribute to the website's development in real-time.
Accessible Customization
Webflow Editor allows for easy customization of various elements, providing control over the look and feel of your website. This accessibility ensures that users can tailor their websites to meet specific branding and design requirements without relying on complex coding procedures.
In summary, Webflow Editor Mode offers a powerful set of features that not only simplify website management but also provide a range of benefits, from user-friendly design to cost efficiency and enhanced SEO capabilities.
Webflow Editor vs. Webflow Designer
Embarking on the journey of website creation in Webflow involves understanding the distinctive roles of Webflow Editor and Webflow Designer. Each tool serves a unique purpose, contributing to the holistic process of building and managing a website. Let's delve into the specific strengths and functionalities of Webflow Editor and Webflow Designer.
Webflow Editor
Content Management Focus
Webflow Editor is tailored for content management, allowing users to update content effortlessly without diving into design intricacies. Its intuitive interface ensures that individuals, regardless of design or development expertise, can contribute to content updates.
Real-Time Editing Experience
Edits in Webflow Editor reflect in real-time, offering instant feedback and facilitating quick adjustments to website content. The collaborative editing feature allows multiple team members to work simultaneously, enhancing teamwork in content creation.
Page Settings and Publishing Ease
Webflow Editor empowers users to manage page settings like password protection, SEO elements, and Open Graph settings directly within the edit mode. It streamlines the publishing process, enabling users to publish changes directly, whether for individual Collection items or entire domains.
Webflow Designer
Design and Layout Expertise
Webflow Designer is the designated tool for structural, style, and element settings changes. Designers use this platform to customize layouts, ensuring a visually unique and appealing design for the website.
Components and Interactions Mastery
In Webflow Designer, users can create and edit main components and component instances, ensuring consistency across the website. The tool also facilitates the addition of interactive elements, animations, and intricate design features to enhance user experience.
CMS Configuration Hub
Webflow Designer serves as the hub for configuring CMS settings, creating new CMS Collections, and defining the structure of dynamic content on the website. Designers have the flexibility to seamlessly integrate custom code and elements directly within the Designer interface.
In summary, Webflow Editor and Webflow Designer play complementary roles in the website creation process. Webflow Editor excels in content management, real-time editing, and efficient publishing, while Webflow Designer is the powerhouse for design, layout customization, and CMS configuration. The strategic use of both tools ensures a comprehensive and efficient approach to building and maintaining a stunning and functional website in Webflow.
How to Use Webflow Editor Mode
Gaining entry to Webflow's powerful Editor is a straightforward process, but the method depends on your role within the Workspace.
For Workspace Members
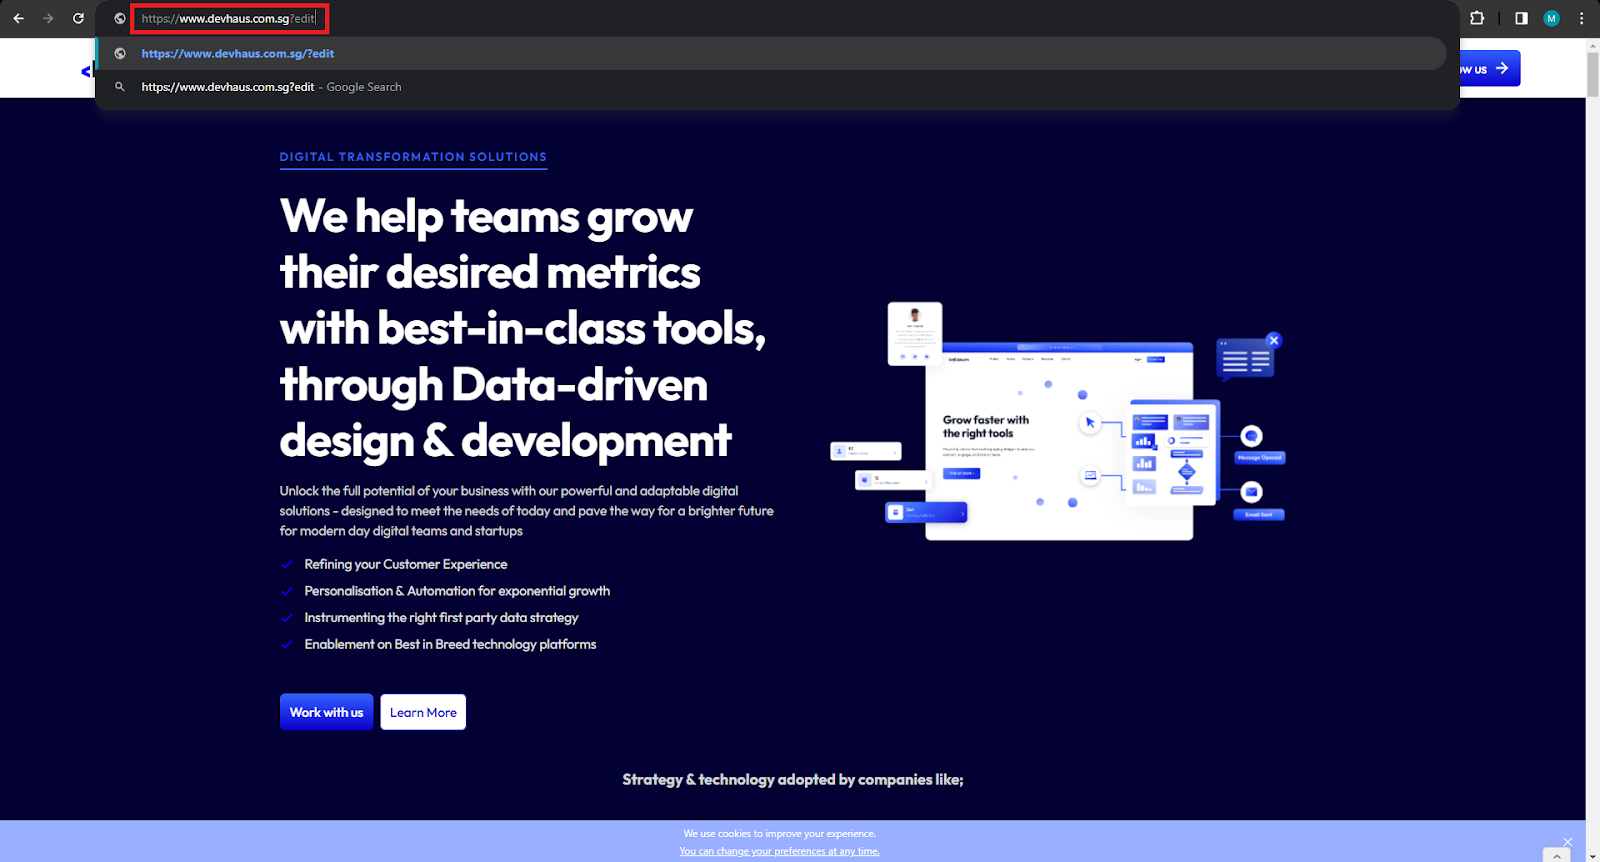
Roles with "Can Edit": If you have a role that permits editing (excluding Commenters), accessing edit mode is as simple as going to the page you want to edit and then just follow these steps:
Step 1: Edit the url by adding “?edit” at the end of it.
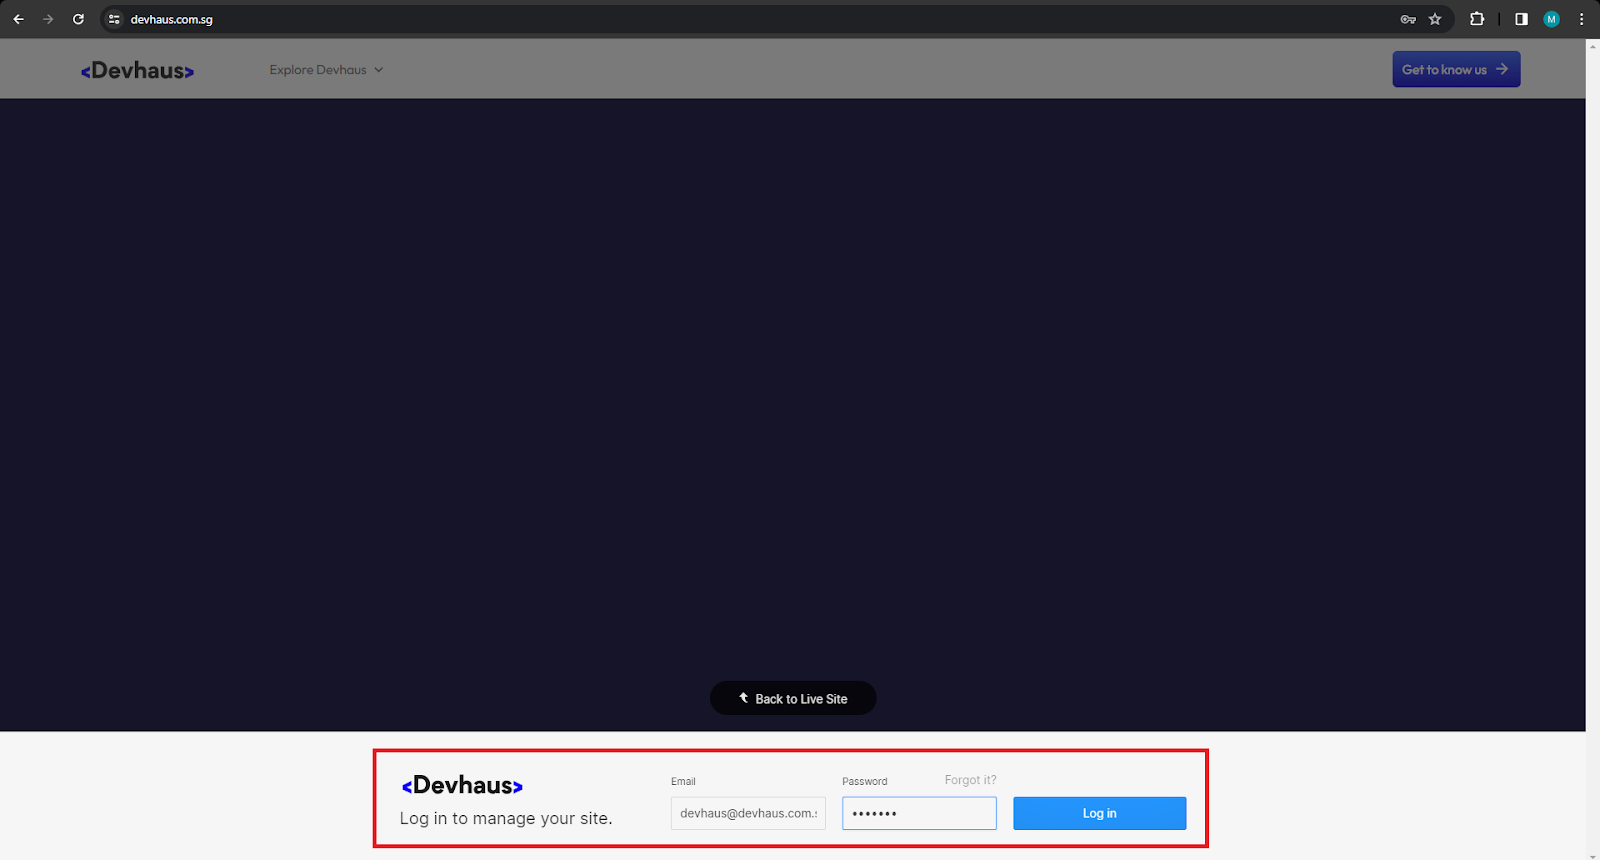
Step 2: Login to your editor account.
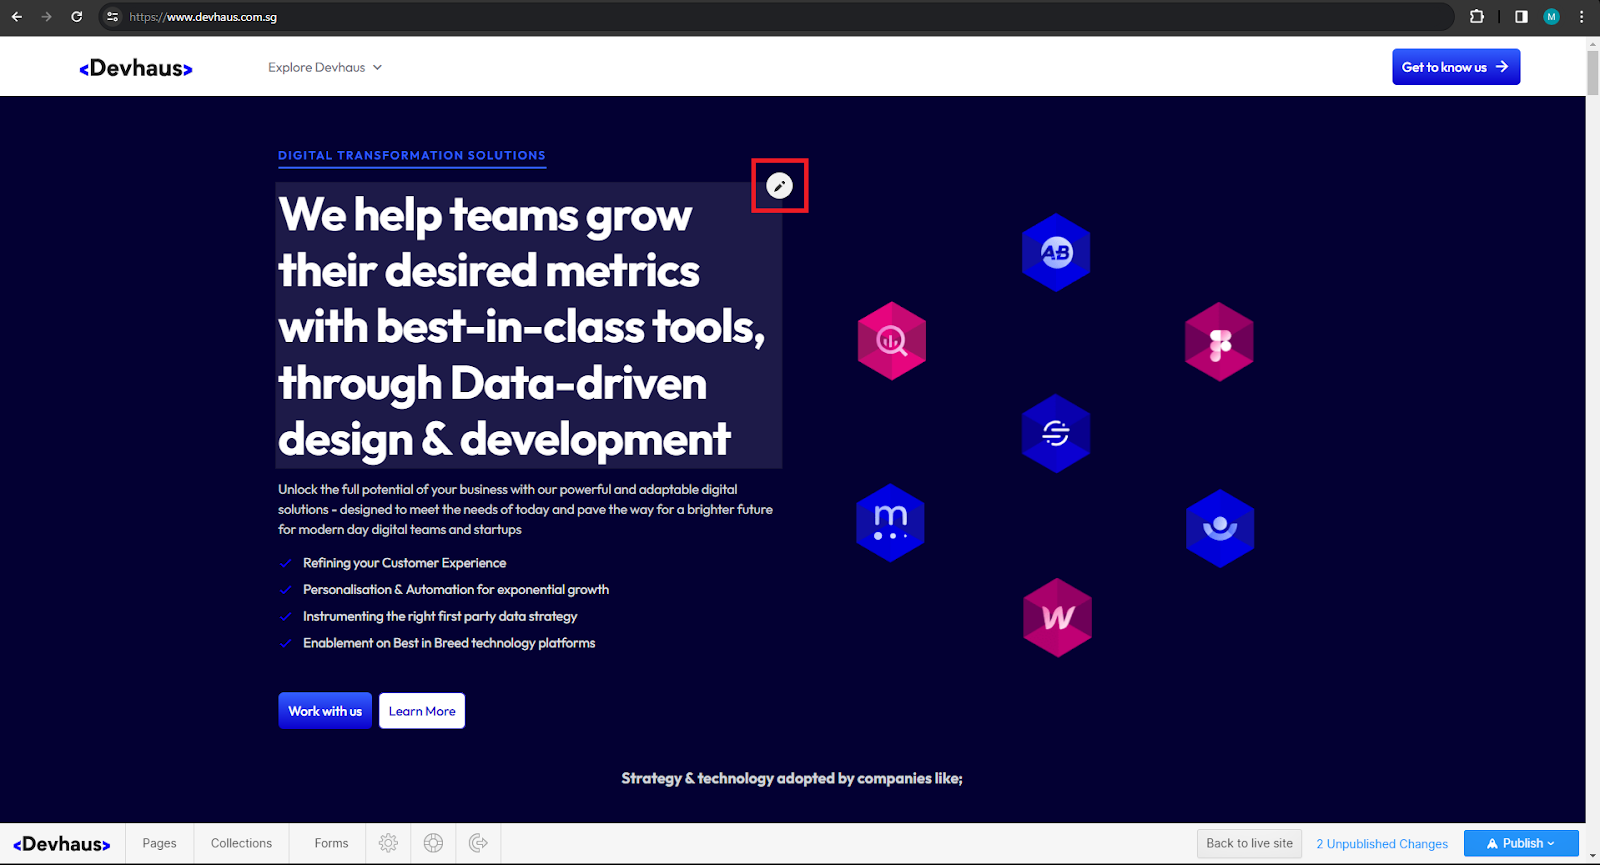
Step 3: Edit the content.
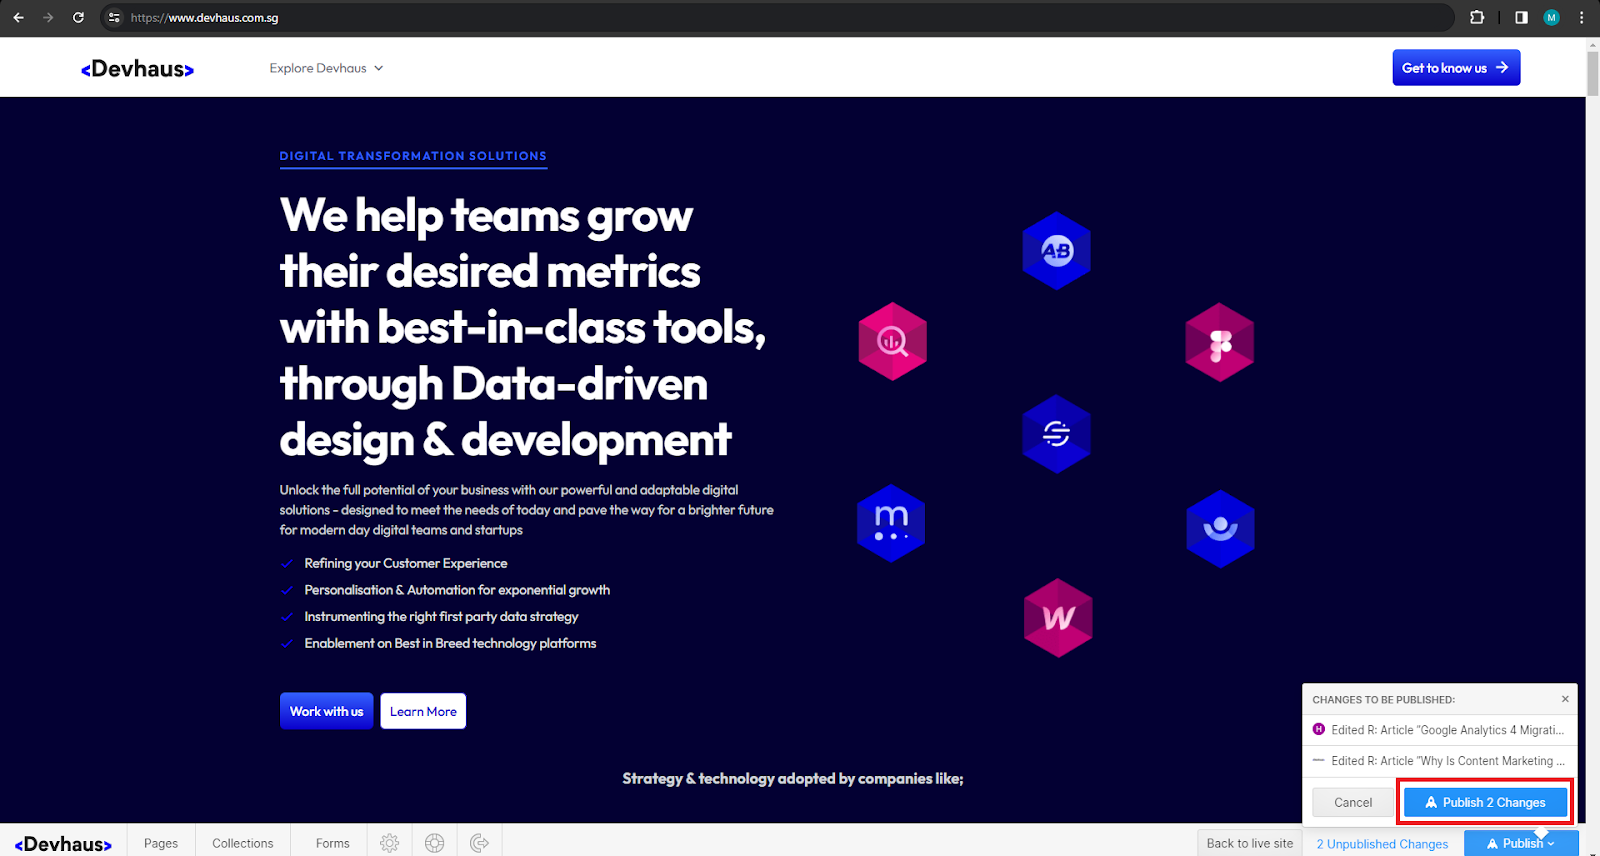
Step 4: Publish the site.
For Designers
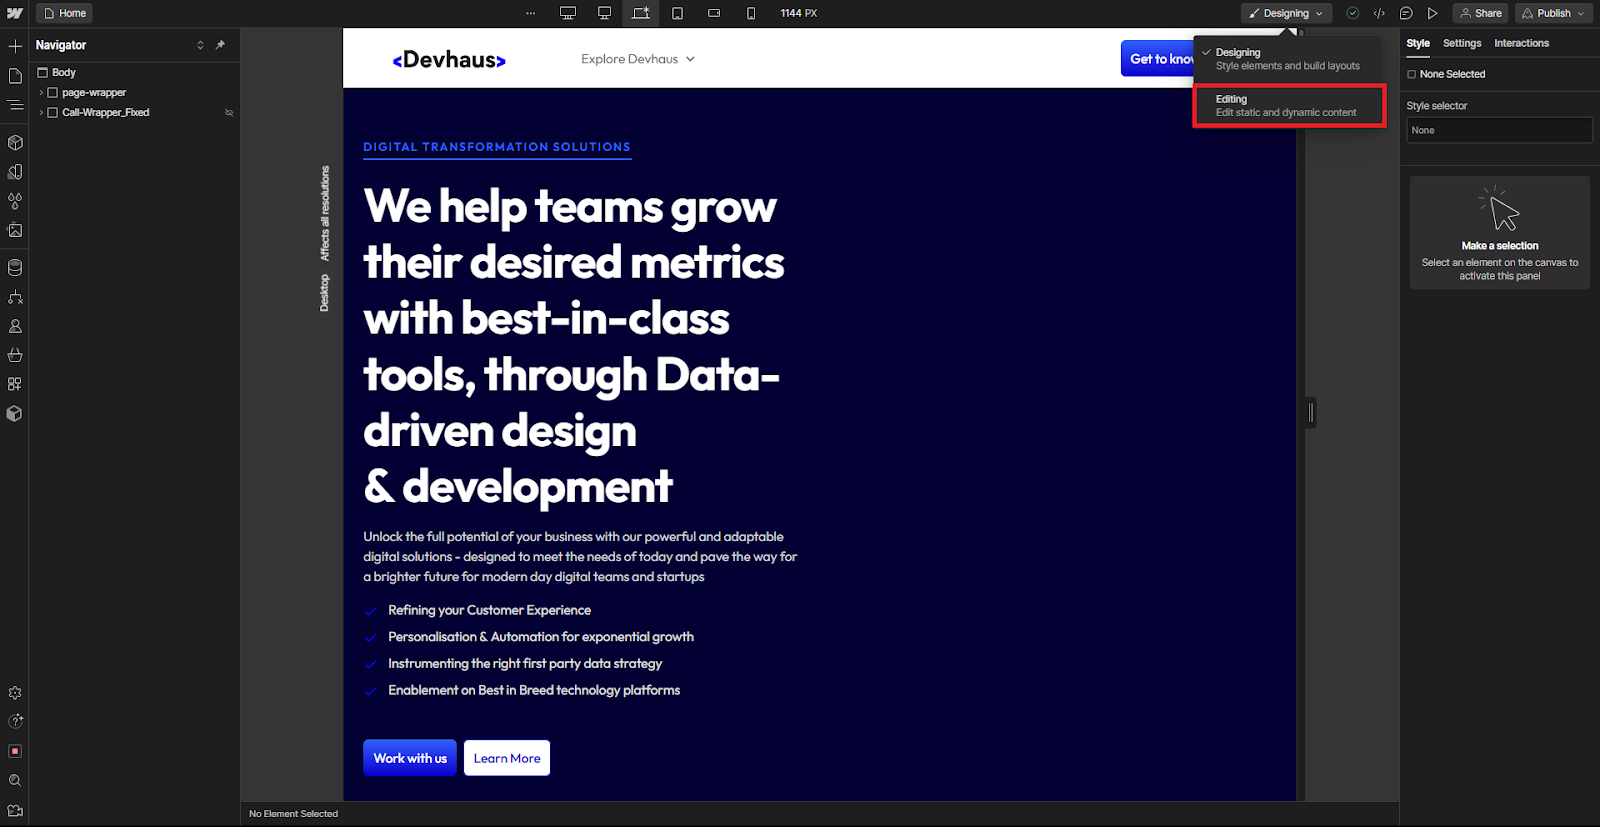
Roles with Designer Access: Designers can enter edit mode by navigating to the site’s Designer and clicking on "Designing" in the top bar. From the dropdown, select "Editing." If another user is already designing, you'll seamlessly transition into edit mode upon entering the Designer.
Once in edit mode, you'll find a suite of tools at your disposal, including the Pages panel, CMS panel, Assets panel, Settings panel, and, for Enterprise sites, the Site Activity log. Furthermore, you'll have access to comments and publishing functionalities if you possess the "Can Publish" permission. Here are some steps to visualise it better for you:
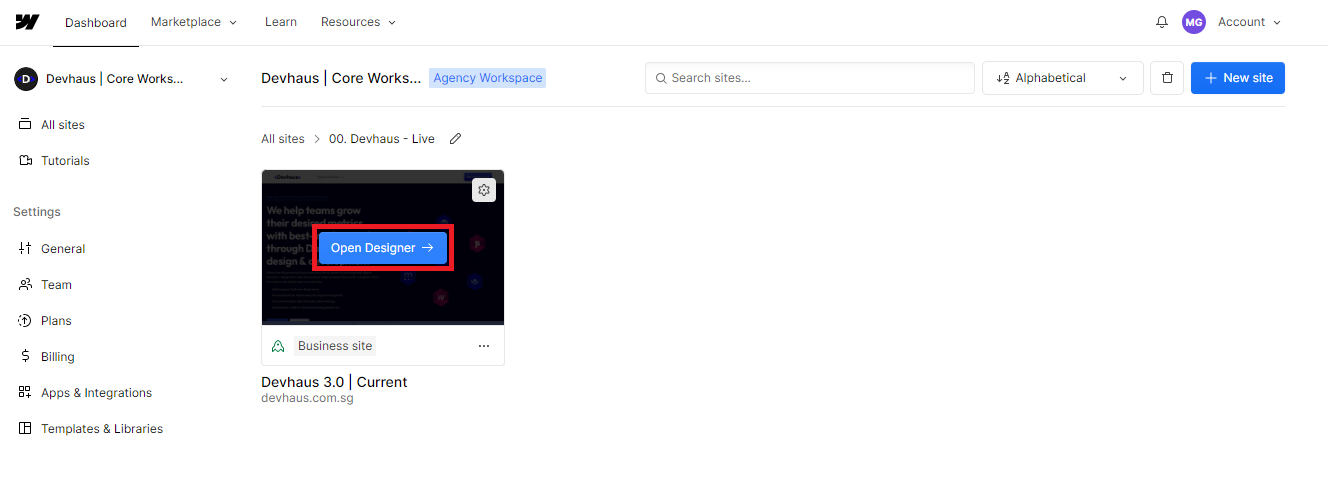
Step 1: Go to your workspace and click on “Open Designer” at your selected site.
Step 2: Change into Editor mode by clicking at the top right of the screen.
Step 3: Edit the content.
Step 4: Publish the site.
How to Edit Site Content Using Webflow Editor
Webflow Editor, a powerful feature within the Webflow platform, facilitates seamless collaboration among team members for editing both static and dynamic site content simultaneously. In Webflow Editor, if multiple individuals are editing the same content simultaneously, the last edits take precedence, underscoring the importance of coordinating editing times with your teammates.
Within the Webflow Editor, you can:
- Edit text, links, and images (excluding background images)
- Manage site assets
- Manage Collection items in the Collections panel
- Manage Ecommerce products, categories, and discounts
When using Webflow Editor, you'll encounter a simplified version of the Designer interface, featuring fewer panel options. Further details about the Designer’s icons can be found in the Webflow documentation.
Editing Text, Links, and Images
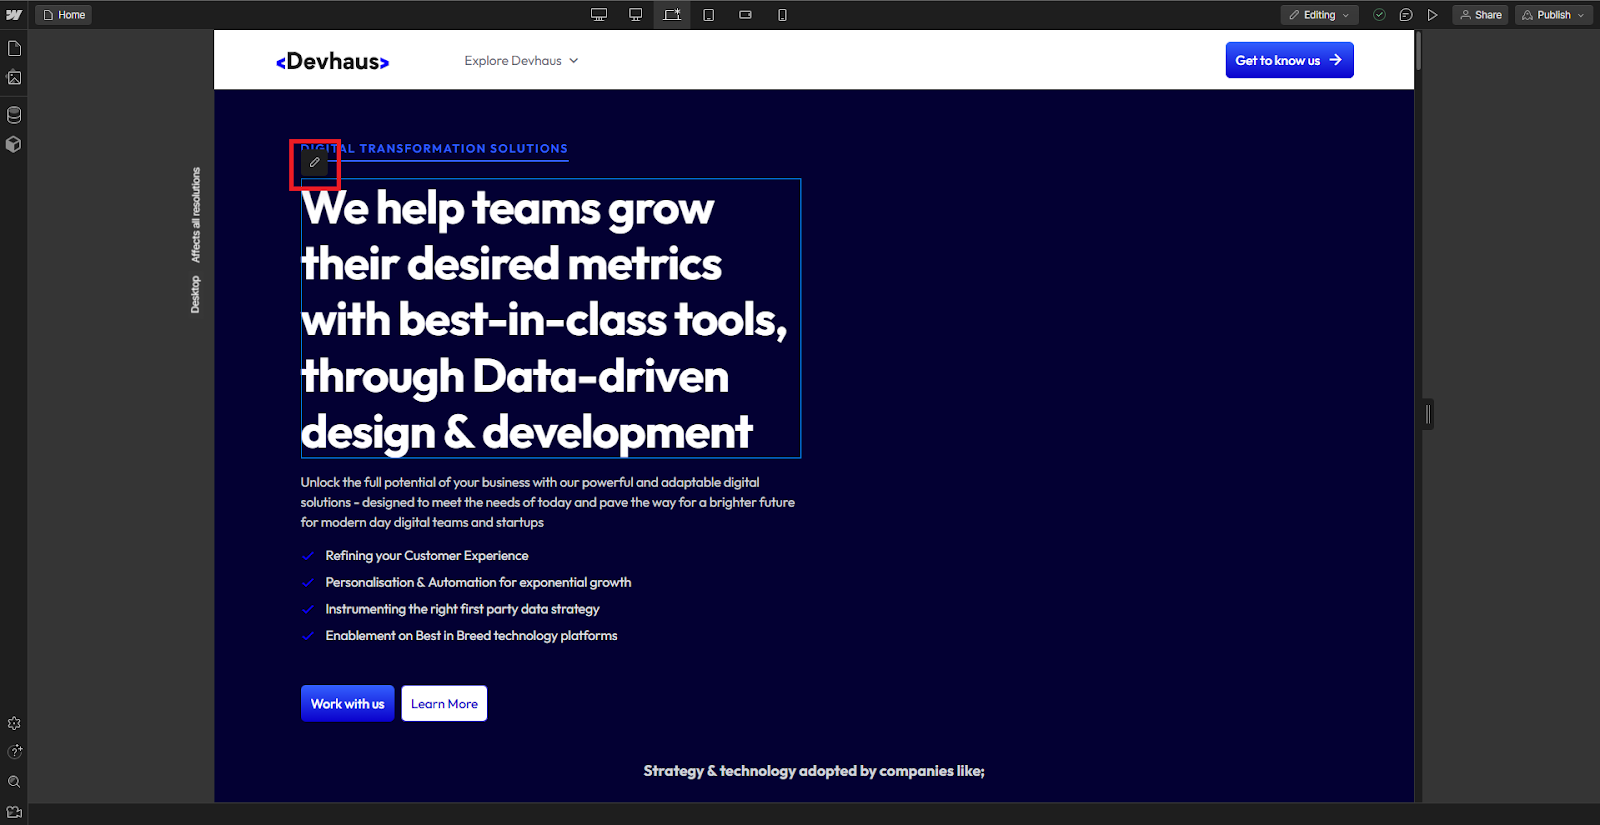
Static content, including text, links, and images, is easily editable in Webflow Editor. Hovering over an editable static element reveals a blue outline. Notably, static elements within components are editable only if properties are attached.
- To edit text (including rich text), select the text element and click the “pencil” icon in the upper-left corner. Edit the text directly on the canvas. Additionally, select text on the canvas to format it (e.g., bold, italicize, wrap with span) using the menu that appears.
- To edit links, select the link element and click the “link” icon in the upper-left corner. Edit the link and its settings.
- To replace images, select the image element and click the “image” icon in the upper-left corner. Manage image settings by selecting the image element and clicking the “cog” icon. New images can also be uploaded to the Assets panel.
Note: Updates to static content within a Collection list (e.g., a button) propagate across all instances in that Collection list.
How to Create and Manage Dynamic Content
Webflow Editor enables the editing of existing Collections and elements connected to Collections.
Editing Collection Items
For sites with existing Collections, you can create, manage, edit, delete, and import/export Collection items in Webflow Editor. Access the CMS panel and click on the Collection name to initiate edits.
While editing a Collection item, preview your content on the Collection item’s page. Click “View content on ‘Collection’ page” to navigate to the Collection item’s page. To return to the Collection item, select a dynamic element on the page and click the “CMS” icon or return to the CMS panel.
Important: Saving changes before previewing is crucial to preserve your edits as a draft or staged changes.
Managing Collection Items with Webflow Editor
Efficiently handling Collection items in the Webflow Editor's CMS panel is a streamlined process that offers a range of tools for enhanced organization and control. Here's a comprehensive guide on managing Collection items with the Webflow Editor:
Paging through Collection Items
When you open a Collection from the CMS panel in the Designer, the first 100 collection items are preloaded and visible. If your Collection exceeds 100 items, use the “Next” and “Previous” pagination buttons at the bottom right of the Designer to page through additional items. Even with pagination, the search bar allows you to quickly locate specific items within the open Collection.
Collection item pagination is highlighted in a Collection in the Webflow CMS panel.
Displaying Collection Fields
To view more Collection fields than those displayed by default, open your Collection and select the “pin” icon in the top right corner of the Designer. This allows you to show or hide fields in the Collection. All Collection fields are pinnable except Image, Multi-Image, Video, and Rich Text fields.
The “pin” icon and its menu highlight available collection fields you can pin to your collection item view.
Searching Collection Items
Open a Collection and type in the search bar to quickly find specific items for editing. Your search will display items with matching values in the Name field.
A search for “flower” displays 2 collection items with matching results in their name fields.
Filtering Collection Items
After adding items to your Collection, use the “filter” button to refine the visible items. Filter options include:
- Status: All (Default), Published, Draft, Scheduled, Archived
- Published: All (Default), Last 24 hours, Last 7 days, Last 30 days
- Created: All (Default), Last 24 hours, Last 7 days, Last 30 days
- Modified: All (Default), Last 24 hours, Last 7 days, Last 30 days
If multiple filter options are selected, the results display in an “and” based combination. To apply a filter:
- Open your Collection
- Press the “filter” button in the top action bar
- Select the filter options
- Press “Apply filters” to save your selections
- Press the “x” or tap anywhere else to close the filter options panel and view results
The “filter” button is highlighted in the top action bar of a Collection, and filter options are displayed after pressing the “filter” button.
Sorting Collection Items
Once items are added to a Collection, you can sort them based on fields present within your Collection. Different fields support different types of sorting, such as comparison-of-value sorting and presence-of-value sorting. You can also see the sort type for each sortable field by clicking the title of the field and hovering over it.
The “latest first” sort type of a “Created” collection field is shown after hovering over it.
Bulk-Editing Collection Items
After sorting or refining visible collection items, activate bulk editing by clicking the Select button in the top action bar. Check the box next to the Name field to select items within view. This feature works even for Collections with more than 100 items.
The “Select” button is highlighted in the top action bar, and multiple collection items are highlighted using the checkbox next to the Name field.
Once selected, perform various bulk actions, including Export, Delete, and Update items, allowing you to stage for publish, publish, save as draft, unpublish, or archive selected items.
Click the “Update items” button to choose from various actions in the dropdown menu.
This comprehensive set of tools in Webflow Editor ensures efficient and organized management of Collection items, providing users with the flexibility to navigate, filter, sort, and bulk-edit their content seamlessly.
Editing Dynamic Elements
Dynamic elements (elements connected to Collections) are editable in Webflow Editor. Hovering over an editable dynamic element reveals a purple outline.
Select editable dynamic elements and click on the “CMS” icon to access the Collection field in the Collection item. Edit dynamic content such as text and images.
How to Manage Ecommerce
For websites with Ecommerce enabled through Webflow Editor, easily add, edit, and publish new Ecommerce products, categories, and discounts.
Managing Page Settings in Webflow Editor
In Webflow Editor, you have the capability to manage specific page settings directly in edit mode, providing a convenient way to control various aspects of your website. Here's a guide to managing page settings and publishing in edit mode:
Page Settings in Edit Mode
You can adjust the following page settings in edit mode:
Page Password Protection
Secure your pages with password protection directly from the edit mode. This feature is particularly useful when you want to restrict access to specific content or sections of your website.
SEO Title and Meta Description
Optimize your page for search engines by customizing the SEO title and meta description. Enhance your website's visibility and ensure it's accurately represented in search engine results.
Open Graph Settings
Fine-tune how your content appears when shared on social media platforms by configuring Open Graph settings. Customize the image, title, and description to create a compelling preview for shared links.
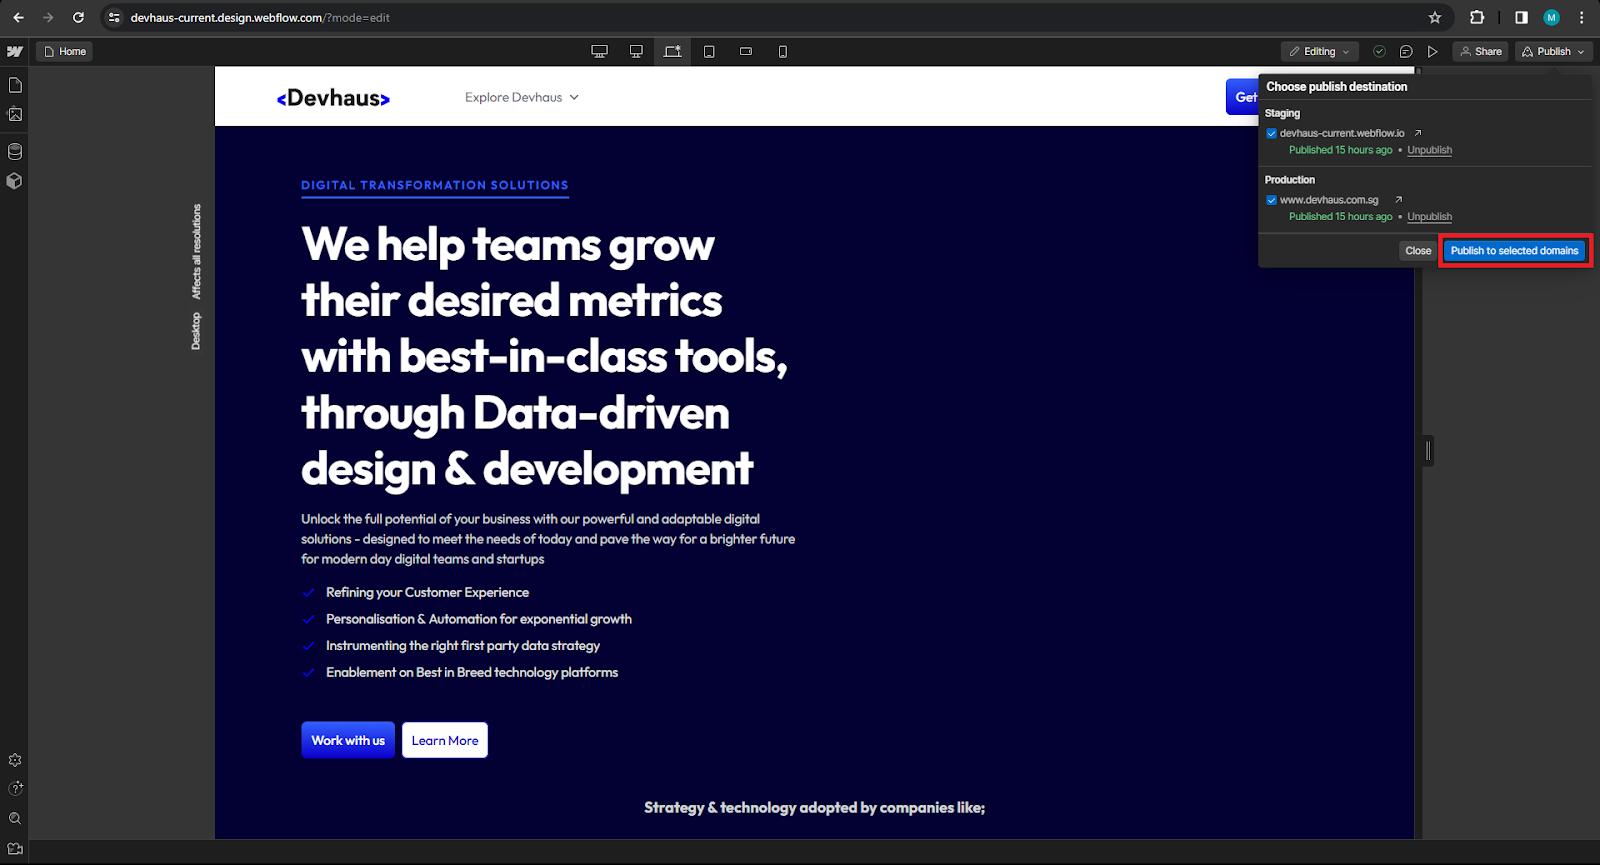
Publishing in Edit Mode
There are three ways to publish changes directly from edit mode:
Publishing Individual Collection Items
Make targeted updates by publishing individual Collection items. This allows you to push specific content changes without affecting the entire site.
Publishing to Your Webflow.io Staging Subdomain
Test your changes in a staging environment by publishing to your webflow.io subdomain. This enables you to preview the modifications before making them live on your production domain.
Publishing to Your Production Domain
When you're ready to make your changes live, publish directly to your production domain. This ensures that the updated content and settings are visible to your audience.
Limitations of Edit Mode
While Webflow Editor provides a robust set of tools for managing content, there are certain limitations in edit mode. You cannot perform the following actions:
Make Design Changes
Edit mode does not support structural, style, or element settings changes. Design alterations should be made in the Designer.
Edit Main Components or Component Instances
Structural edits to main components or component instances are restricted in edit mode.
Edit Dynamic Content on the Canvas
Direct editing of dynamic content on the canvas is not possible in edit mode.
Adjust Page Names, Folders, Slugs, or Set a Homepage
Edit mode does not allow changes to page names, addition or editing of page folders, editing page slugs, or setting a homepage. These adjustments should be made in the Designer.
Add or Edit Custom Code and Elements
Custom code and elements cannot be added or edited directly in edit mode.
Update CMS Settings or Create New CMS Collections
CMS settings and the creation of new CMS Collections are restricted in edit mode.
Understanding these limitations ensures that you use the appropriate tools in the Webflow platform for different aspects of website management, providing a seamless and efficient workflow.
For Companies operating in Singapore, there are a couple of government subsidies that you could look into to help finance and subsidise your next strategy project - yes, including Webflow and your CMS strategy.
If you're a company operating in Singapore, there are a couple of government subsidies that you could look into to help finance and subsidise your next strategy project - including refining your entire digital experience and your CMS.
The Singapore government has a lot of incentives and subsidies for companies to grow.
We'd strongly advise you to look through the various grants available for Singapore companies to explore to help you get your project subsidised.
If you'd like to explore all the available grants, feel free to visit our Singapore grants navigator here
Action steps moving forward
We hope this article has given you a better understanding of customer data platforms and why they're so important to marketers. If you're looking for more information on how CDPs can help your business, feel free to contact us today!
- Fill us in on your interest via this form
- Check your email for our booking slot with our beloved sales team
- Walkthrough a discovery session with us and align your desire outcome for your transformation project with us <3
Looking forward to catching up with you soon!