Overview
Welcome to the Devhaus Looker Studio Template! This documentation will guide you through the process of downloading and connecting the Looker Studio file to your Google Analytics 4 and Google Search Console accounts. Additionally, we’ve also included Google Ads report to the dashboard.
Introduction
Looker Studio is a powerful analytics and data exploration tool that empowers users to derive meaningful insights from their data. Its significance lies in its ability to provide a user-friendly interface, advanced visualizations, and seamless integration with various data sources. This section outlines the key reasons why Looker Studio is essential for your analytics workflow.
Prerequisites
Before you begin, ensure you have the following:
- A Looker Studio account [you will need a gmail account]
- Administrator-level permissions in Looker
- Access to Google Analytics 4
- Administrator-level permissions in Google Analytics 4
- Access to Google Search Console
- Administrator-level permissions in Google Search Console
Connecting Looker Studio to Google Analytics 4
Step 1: Open Looker Studio
- Log in to your Looker account.
- Navigate to the "Develop" section and select "Looker Studio."
- Click on the "New Project" button.
Step 2: Make a copy of Devhaus Looker Studio Template file
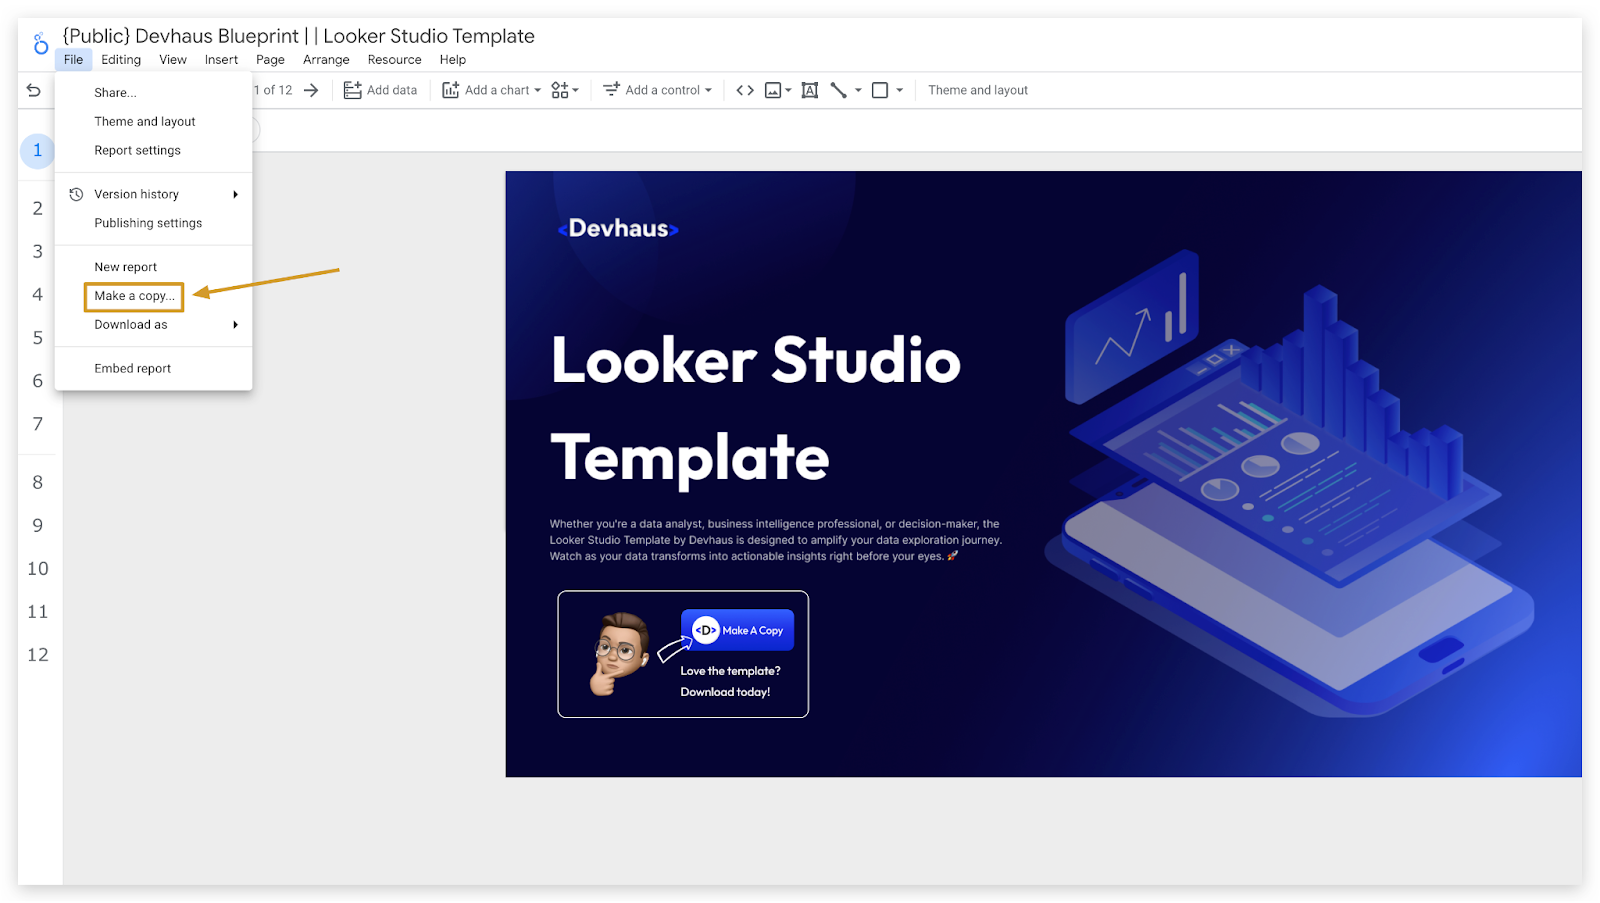
- Navigate to the Looker Studio Templates file.
- Locate the “File” tab and click make a copy.
- Once you’ve made the copy, the file now belongs to you and you can share it with your team.
- Click "Open" to import the template into your Looker Studio.
Step 3: Configure Google Analytics 4 Connection
In Looker Studio, find the newly imported project.

- Open the project and navigate to the "Connections" tab.
- Click on "Add Connection" and choose "Google Analytics 4."
- Follow the on-screen instructions to authenticate and connect your Google Analytics 4 account.
Connecting Looker Studio to Google Search Console
Step 1: Add Google Search Console Connection
- In Looker Studio, go back to the "Connections" tab.
- Click on "Add Connection" and select "Google Search Console."
- Follow the prompts to authorize Looker Studio to access your Google Search Console data.
Step 2: Configure Google Search Console Connection
- Once the authorization is complete, configure the connection settings.
- Specify the properties and websites you want to connect to Looker Studio.
Step 3: Validate and Save
- After configuring the connection, click "Validate" to ensure a successful connection.
- Save the changes and exit the connection settings.
Finalising the Setup
- Go back to the Looker Studio project and navigate to the "Dashboards" or "Reports" tab.
- Customise the dashboards and reports based on your specific needs.
- Save and publish the project to make it accessible to other team members.
Note: Ensure you have administrator-level permissions in Looker, Google Analytics 4, and Google Search Console before proceeding with the setup.
Congratulations! You have successfully downloaded the Devhaus Looker Studio Template and connected it to your Google Analytics 4 and Google Search Console accounts. Explore the insights and visualisations provided in Looker Studio to enhance your analytics experience. If you encounter any issues, refer to the troubleshooting section or contact Devhaus support for assistance.
Enable Google Analytics 4 (GA4)
To enable Google Analytics support (bypassing CDP), you need to add the ga4 attribute and put your measurement ID as the value:
<script
id="devhaus-tracking-code"
defer
src="https://cdn.jsdelivr.net/gh/BuildWithDevhaus/devhaus-tracking-code@latest/dist/index.js"
production-domain="example.com"
staging-domain="example.webflow.io"
ga4="G-XXXXXXXXXX"
>
</script>
To enable GA4 DebugView, you need to add the ga4-debug-mode attribute and put true as the value: NOTE: This feature is unstable and may not work as expected.
<script
id="devhaus-tracking-code"
defer
src="https://cdn.jsdelivr.net/gh/BuildWithDevhaus/devhaus-tracking-code@latest/dist/index.js"
production-domain="example.com"
staging-domain="example.webflow.io"
ga4="G-XXXXXXXXXX"
ga4-debug-mode="true"
</script>